 Eng. Kamrul Islam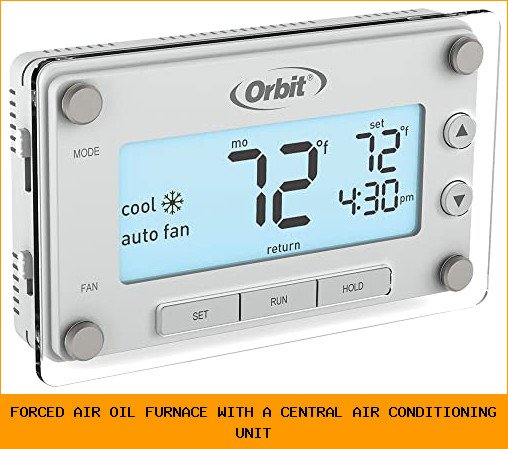
In this guide
- Understanding Compatibility: Furnace and…
- Types of Air Conditioning Systems Suitable…
- Cost Analysis: Budgeting for Your AC Addition
- Step-by-Step Installation Process
- Maintenance Considerations for Integrated…
- Enhancing Indoor Air Quality with AC…
- Choosing the Right HVAC Contractor: What to…
- Common Challenges and How to Overcome Them
- Long-Term Savings and Energy Efficiency…
- Environmental Considerations and…
- 5 Real Questions People Ask About This Topic
- Taking Action: What to Do Next
You have a house with a forced air oil furnace that keeps you warm through the winter. Now you want central air conditioning for the hot months. The good news: you can add a central AC unit to your existing furnace and ductwork. The bad news: it’s not always a simple swap, and a few things can trip you up if you don’t plan ahead.
This article walks you through the whole process — what to check before you buy anything, which AC systems work with your setup, how much you should expect to spend, and how to pick a contractor who won’t mess it up. You will learn exactly how a forced air oil furnace with a central air conditioning unit can work efficiently in your home, plus the common mistakes that cost homeowners time and money. No fluff. Just the stuff you actually need.
Understanding Compatibility: Furnace and Ductwork Requirements
Before you call any contractors, take a close look at your existing furnace and ducts. Not every oil furnace can handle the extra airflow that central AC demands. And some duct systems are too small, too leaky, or too dirty to work right.
First, check your furnace’s blower motor. Most modern oil furnaces have a blower rated for at least 400 CFM (cubic feet per minute) per ton of cooling. A 3-ton AC unit needs about 1,200 CFM. If your furnace blower can’t move that much air, you’ll either need a bigger blower or a separate air handler — which adds cost and complexity.
Second, look at your ductwork. Central AC requires insulated ducts that are sized correctly. Undersized ducts cause pressure drops, low airflow, and frozen evaporator coils. Oversized ducts waste energy and make rooms unevenly cool. Have a contractor do a Manual D calculation to verify duct size. Leaky ducts are also a problem — they let cold air escape into your attic or crawl space, ruining efficiency.
Third, your furnace needs a coil cabinet or a plenum where the evaporator coil can sit. Some oil furnaces have a spot for it. Others require a transition piece. Your contractor will measure the existing furnace cabinet to see if a matched coil fits.
Types of Air Conditioning Systems Suitable for Existing Furnaces
You have three main paths here. Each has trade-offs.
Split System Central AC
This is the standard setup: an outdoor compressor unit connected to an indoor evaporator coil that sits on top of your oil furnace. The furnace blower pushes air across the cold coil, cooling your home. This works well if your furnace is in decent shape and your ductwork handles the CFM. Expect a SEER rating between 14 and 20, depending on the model. It’s the most common solution for a reason — reliable, affordable, and easy to service.
Heat Pump
A heat pump replaces the AC-only outdoor unit with one that can also heat in moderate weather. But you already have an oil furnace for heat. So a heat pump becomes a “dual fuel” system: the heat pump runs when temps are above about 40°F, and the oil furnace kicks in below that. This saves oil and reduces emissions. Downside: heat pumps cost more upfront, and the dual-fuel control board can be tricky to wire correctly. If you live in a very cold climate (below 0°F regularly), the heat pump’s efficiency drops sharply, and the furnace carries most of the load anyway.
Ductless Mini-Split
If your ductwork is undersized, leaky, or nonexistent, a ductless mini-split might be a better bet. You mount a small outdoor unit and connect it to indoor wall-mounted heads. They don’t use your furnace at all. They’re very efficient (SEER up to 30) and give you zoned cooling. But they are expensive per room, and you lose the single-thermostat control that works with your oil furnace. Also, you’ll still need the oil furnace for heat unless you also add heat pump heads. Most homeowners looking to integrate with their existing forced air system skip mini-splits for whole-home cooling.
Cost Analysis: Budgeting for Your AC Addition
Let’s talk real numbers — not exact prices, because those change by region and season, but ranges you can expect.
- Split system central AC (2.5 to 4 tons): $3,500 to $6,500 installed for a basic 14 SEER unit. Higher SEER (18+) runs $5,500 to $9,000. This includes the outdoor unit, evaporator coil, refrigerant lines, and installation labor.
- Heat pump (same capacity): $4,500 to $8,000 installed for a standard efficiency model. Add another $500 to $1,500 for a dual-fuel control board and thermostat that can switch between heat pump and furnace.
- Ductwork modifications: If your ducts need resizing, sealing, or new runs, add $1,000 to $3,000. If you need a new return air drop or larger filter grille, budget accordingly.
- Electrical work: AC units need a dedicated 220V circuit and a disconnect switch. If your panel is full or far away, expect $500 to $1,200.
- Permits and inspections: Usually $150 to $400, but varies widely. Skip the permit and you risk insurance denial if something goes wrong.
Total for a typical forced air oil furnace with a central air conditioning unit retrofit: $4,500 to $9,000. That’s a wide range because every house is different. Get at least three itemized quotes.
Step-by-Step Installation Process
Here is how a professional contractor will add central AC to your oil furnace. The process takes one to three days.
- Site inspection and measurement. Contractor checks furnace clearance, duct dimensions, electrical panel capacity, and outdoor location for the condenser unit.
- Install indoor coil. They either place the evaporator coil in a new cabinet on top of the furnace or install it inside the existing plenum. They cut into the ductwork for the coil access and mount a drain pan and condensate line.
- Run refrigerant lines. Two copper lines (suction and liquid) connect the outdoor unit to the indoor coil. They must be insulated and protected from physical damage. Length matters — runs over 50 feet reduce efficiency and may need a larger line set.
- Mount outdoor condenser unit. On a concrete pad or wall brackets, at least 12 inches from the house. Must be level, with clearance for airflow and service access.
- Electrical connections. They pull a new circuit from the panel to a disconnect switch at the outdoor unit, then wire the condenser and indoor unit. They also run low-voltage thermostat wire — typically 18/5 from the furnace to the new thermostat.
- Refrigerant charge and test. They pull a vacuum on the lines, leak-check, then charge the system with refrigerant per manufacturer specs (R-410A is standard now). They start the system, check pressures, superheat, and subcooling.
- Final adjustments. Verify airflow across the coil (should be within 350-400 CFM per ton), check temperature drop (typically 14-20°F difference between return and supply), and set the thermostat.
Maintenance Considerations for Integrated Systems
Your oil furnace and AC share the same blower and ductwork. That means neglecting one can hurt the other. A dirty furnace filter clogs the evaporator coil, reducing cooling capacity and freezing the coil. An oily furnace heat exchanger can blow soot into the ducts, which then coats the AC coil and ruins efficiency.
Change the filter every 1-3 months — more often if you have pets or heavy dust. Have the oil furnace serviced annually before winter, and the AC system serviced each spring. The contractor should clean the condenser coil (outdoor unit) with a hose, check refrigerant levels, inspect the condensate drain for clogs, and verify that the blower motor and capacitor are in good shape.
A simple thermostat upgrade makes maintenance easier. The Orbit 83521 Clear Comfort Programmable Thermostat lets you schedule different temperatures for each day, with a large display you can read from across the room. Its early start mode ensures the house reaches your desired temp by the programmed time — no waking up to a cold house in fall or a hot house in summer. It works with forced air oil furnaces and central AC (but not multi-stage systems or baseboard heaters). Accurate to ±1 degree, it helps your system run efficiently without constant tinkering.
Enhancing Indoor Air Quality with AC Integration
When you add central AC to your oil furnace, you also get an air handler that runs year-round. That means you can upgrade your indoor air quality (IAQ) without buying separate equipment.
Consider these IAQ improvements:
- MERV 11 or MERV 13 filters in the filter grille or a 4-inch media cabinet. They catch pollen, mold spores, and pet dander. Just make sure your furnace blower can handle the pressure drop — high-MERV filters restrict airflow. A 4-inch pleated filter has more surface area and less restriction than a 1-inch one.
- UV-C lights installed in the duct near the evaporator coil kill mold and bacteria on the coil surface. They also reduce coil cleaning frequency.
- Humidifier or dehumidifier. In humid climates, a whole-house dehumidifier can pull moisture from the air before it reaches the coil. In dry climates, a bypass humidifier adds moisture. Both integrate with your ductwork.
- Duct sealing prevents dust and insulation particles from entering the airstream. Aerosol-based sealants (like Aeroseal) can reduce leakage by 90%.
Don’t forget that your oil furnace produces combustion gases. Make sure the flue is clean and the heat exchanger is intact — a cracked heat exchanger can allow carbon monoxide into the ductwork. Annual furnace inspections catch this.
Choosing the Right HVAC Contractor: What to Look For
I have seen too many homeowners pick the cheapest bid and end up with a system that underperforms. Here is how to find a contractor you can trust.
Ask these questions:
- Are you licensed, bonded, and insured? Verify with your state licensing board.
- Do you have experience with oil furnaces specifically? Some techs only see gas units — oil systems are different (flue, pump, nozzles).
- Will you perform a Manual J load calculation? Without it, you risk oversizing or undersizing the AC. A load calculation considers square footage, insulation, window area, and climate.
- What brand of equipment do you recommend, and why? A good contractor can explain the trade-offs between Carrier, Trane, Lennox, Rheem, Goodman, etc.
- Can you provide references from similar retrofits? Call those references and ask about the install quality, follow-up service, and if the system met expectations.
Red flags: contractors who quote over the phone without seeing your house. Those who push a single brand without giving options. Anyone who says you don’t need a permit. Also, avoid contractors who insist on a heat pump without explaining the dual-fuel controls required for your oil furnace.
Common Challenges and How to Overcome Them
Adding central AC to an oil furnace isn’t always smooth. Here are the problems I see most often and how to fix them.
- Insufficient airflow. If your furnace blower is undersized, your AC will freeze up. Solution: upgrade to a variable-speed blower motor (ECM) — it compensates for duct restriction and runs more efficiently.
- Ductwork leaks. Leaky ducts reduce cooling at the registers and increase electric bills. Solution: have a duct blaster test done to measure leakage, then seal all joints with mastic tape. Do not use duct tape — it dries out and fails.
- Oil furnace heat exchanger soot. If your oil burner is running rich, it can coat the AC coil with black soot. Solution: have the oil burner tuned to proper combustion efficiency (CO2 around 10%, smoke number 0-1).
- Condensate drain issues. The AC coil produces gallons of water per day. If the drain line clogs, water backs up and can damage your furnace. Solution: install a float switch in the drain pan that shuts off the AC if the pan fills up. Clean the drain annually.
- Thermostat incompatibility. Some old thermostats don’t have enough wires for both heat and cool (you need at least 5 wires: R, W, Y, G, C). Solution: pull new thermostat wire or use a power extender kit. The Orbit 83521 requires a C-wire, so check compatibility first.
Long-Term Savings and Energy Efficiency Benefits
A properly sized and installed central AC system can cut your cooling costs by 20-40% compared to window units or a worn-out old system. Here is a rough example: a 2,000 sq ft home in a moderate climate might see an annual cooling bill of $600 with a 14 SEER AC. Upgrade to an 18 SEER unit and that drops to about $450 — saving $150 per year. Over a 15-year lifespan, that’s $2,250. The higher efficiency unit costs about $1,500 more upfront, so you break even in 10 years and then save after that.
But savings depend on ductwork condition. Leaky ducts can waste 20-30% of conditioned air. Sealing them pays back in 2-3 years. Adding attic insulation also reduces AC load. A programmable thermostat like the Orbit 83521 helps by raising the temperature when you’re away — you can save 10% per year on cooling just by setting it back 5-7°F for 8 hours a day.
Don’t forget utility rebates. Many states and electric companies offer rebates for high-SEER AC units, heat pumps, and programmable thermostats. Check the DSIRE database or your local utility’s website. Also, the federal tax credit for residential energy efficiency (25C) may apply — currently 30% up to $2,000 for heat pumps, but not for standard AC units (check current year rules).
Environmental Considerations and Sustainability
Oil furnaces produce more CO2 per BTU than natural gas or electric heat pumps. Adding central AC to an oil furnace does not change the carbon footprint of your heating, but it does add electricity consumption for cooling. The grid is getting cleaner each year as renewables come online, so the net impact depends on your region.
If you want to reduce emissions, consider a heat pump as your AC unit. That way, you can run the heat pump for most heating needs (reducing oil use) and only fall back on the oil furnace during extreme cold. Even a modest heat pump with a SEER of 16 and an HSPF of 9 can cut your oil consumption by 30-50% in a mixed climate.
Another option: pair your oil furnace with a high-efficiency AC unit (SEER 18+) and offset the electricity with solar panels. That gives you near-zero cooling emissions. Also, make sure any old R-22 refrigerant (Freon) is properly reclaimed and recycled — newer R-410A units have less ozone depletion potential.
5 Real Questions People Ask About This Topic
Can I just connect a window unit to my ductwork?
No. Window units are not designed to push air through ducts. They have low static pressure and small fans. Even if you managed to rig a duct, the airflow would be pathetic and the unit would freeze or overheat. Use a proper split system or mini-split.
Do I need a separate thermostat for the AC and furnace?
No, you can use one thermostat that controls both. Most modern thermostats have separate terminals for heating (W) and cooling (Y). The thermostat sends a signal to the furnace control board, which activates the blower and outdoor unit as needed. The Orbit 83521 supports this configuration — just make sure your furnace has a control board that can handle the Y signal.
Will my oil furnace’s efficiency affect AC performance?
Indirectly, yes. If the furnace is dirty or has a weak blower, airflow across the AC coil suffers. A clean, well-maintained furnace with a properly sized blower ensures the AC operates at its rated efficiency. If your furnace is older than 20 years, you might save money by replacing both at the same time.
How long does the installation take?
A typical split system installation takes 1 to 2 days for a crew of two. Day one: install indoor coil, run refrigerant lines, mount outdoor unit, and wire low-voltage. Day two: electrical connections, charge refrigerant, test, and final adjustments. If ductwork modifications are needed, add 1-2 days.
What SEER rating should I choose for my oil furnace AC combo?
It depends on your climate and budget. For most regions, a 16 SEER unit provides a good balance of upfront cost and efficiency. In hot climates (South, Southwest), go for 18 SEER or higher because cooling runs more months. In cooler climates (Northeast, Midwest), 14-16 SEER is usually fine. Don’t oversize — a 2-ton 14 SEER unit that runs longer cycles actually dehumidifies better than a 3-ton unit that short-cycles.
Taking Action: What to Do Next
- Check your furnace blower rating (CFM) and ductwork size before calling contractors. Write down the model number of your oil furnace.
- Get 3-4 quotes. Request a Manual J load calculation and a Manual D duct design from each contractor. Refuse any quote that skips these.
- Decide between a split system AC and a dual-fuel heat pump. If you want lower oil bills, go heat pump. If you want the lowest upfront cost, go AC-only.
- Upgrade your thermostat to a programmable model like the Orbit 83521. Set schedules that match your daily routine — early start mode means you don’t wake up to a cold house in fall.
- Plan for duct sealing if your ducts are in unconditioned space. It pays for itself within 3 years through lower utility bills.
- Schedule annual maintenance for both your oil furnace and AC. A clean system runs 10-15% more efficiently.
- Check for local rebates and federal tax credits before purchasing equipment. They can shave $500-$2,000 off your total cost.

Eng. Kamrul Islam
Founder and product researcher
Engineer with more than 10 years of experience researching and selling products on Amazon, including his own brand on Amazon Australia. He compares specs, standards, sellers and owner feedback.
All guides by Eng. Kamrul IslamMore in ac & compressor oils
All 193 guides Guide
GuideAuto Air Conditioning Oil Charge: Why It Matters and How to Do It Right
You bought a can of refrigerant at the auto parts store. You connected the hose, squeezed the trigger,…
 Guide
GuideOil Trap Air Conditioning: What It Is, Why You Need It, and How to Install It
You have a central AC that runs fine for ten years. Then one summer the compressor starts rattling,…
Can Ac Worsen Allergies?
As the weather heats up, many people turn to air conditioning as a way to stay cool and…