 Eng. Kamrul Islam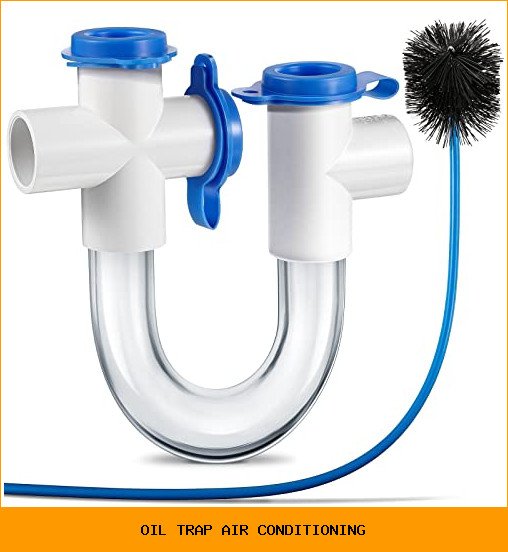
In this guide
- Gulfmew 3/4 Inch Standard Condensate Trap…
- What Exactly Is a Refrigerant Oil Trap?
- Why Your System Needs One — The Real…
- Types of Oil Traps: P-Traps, U-Traps, and…
- When and Where to Install an Oil Trap
- How to Install a Refrigerant Oil Trap —…
- Troubleshooting Common Oil Trap Problems
- Maintenance Tips That Keep Oil Traps Working
- Case Studies: What Happens When Oil Traps Fail
- Final Takeaways — What to Remember
You have a central AC that runs fine for ten years. Then one summer the compressor starts rattling, the system short-cycles, and a technician tells you the compressor is locked up. He says there’s no oil getting back to it. That’s a $2,500 repair you didn’t budget for. The fix might have been a $20 piece of pipe called a refrigerant oil trap.
An oil trap is a simple U-shaped bend in the suction line that holds a small pool of compressor oil. Gravity keeps that oil from being sucked back into the compressor, but it also lets enough oil pass so the compressor stays lubricated. Without one, oil can accumulate in the evaporator or leave the compressor starved. This article covers the different types of oil traps, when you must have one, how to install it yourself if you’re handy, and how to troubleshoot the common problems.

Gulfmew
Gulfmew 3/4 Inch Standard Condensate Trap with Cleaning Brush, PVC U Trap for HVAC Systems, Air Conditioner, Effectively Drains Condensate(1 Pack)
Effectively Drains Condensate: the standard condensate trap adopts a gradient design to effectively drains condensate in a variety of HVAC systems; The U shape pipe filled with water is enough to stop the suction from pulling water back into the air conditioner, stopping the backflow of condensed water, so that the water can be drained smoothly
Buy on AmazonA separate but equally important trap is the condensate trap on your drain line. Stale water or debris can block the condensate drain, cause water damage, or allow sewer gas to enter your home. The Gulfmew 3/4 Inch Standard Condensate Trap with Cleaning Brush handles that job. It’s a clear PVC U-trap that screws apart for cleaning and includes an 18-inch brush. While it doesn’t affect refrigerant oil, keeping your condensate line clear protects your indoor air quality and prevents mold growth. The installation on a 3/4-inch PVC drain line is straightforward, but remember to prime and cement every joint or it will leak.
What Exactly Is a Refrigerant Oil Trap?
A refrigerant oil trap is a small U-shaped section of the suction line, usually made of the same copper or pipe material as the rest of the refrigerant circuit. As refrigerant gas moves through the system, it carries microscopic droplets of compressor oil. The trap creates a low-point where that oil collects. Gravity pulls the oil down, and the gas flow picks up a small amount to carry back to the compressor. The trap acts like a reservoir: too deep and oil never returns, too shallow and oil blows right through.
Most manufacturers specify a trap depth of 1 to 2 inches of vertical rise from the bottom of the U to the horizontal pipe. Anything deeper can hold so much oil that the compressor runs dry during startup. Anything shallower defeats the purpose.
Oil traps are common in split systems where the evaporator sits higher than the compressor. If the compressor is below the evaporator, gravity naturally returns oil. But when the evaporator is above — typical in attic units — the suction line must rise vertically to reach the compressor. That vertical riser needs a trap at the bottom to collect oil that falls back during off-cycles.
Why Your System Needs One — The Real Cost of Skipping It
Compressor oil does three things: lubricates bearings, seals piston rings, and carries heat away. Without adequate oil return, the compressor wears abnormally fast. A compressor that starves of oil has a median life of about 3 to 5 years versus 12 to 15 for one that stays properly lubricated.
The damage is gradual. First you notice the system takes longer to cool. Power bills creep up. Then the compressor starts making a high-pitched whine, especially during startup. By the time it locks up, you’re looking at a compressor replacement plus a full system flush to remove the burnt oil from the lines. That flush adds another $300 to $700 to the repair bill.
A correctly installed oil trap adds maybe $15 in materials and 30 minutes of work. The return on investment is enormous. But many residential systems still ship without them. Manufacturers assume the installer will add a trap if the line set has a vertical riser longer than 2 feet. That assumption often fails. According to one HVAC trade study, over 40% of compressor failures in residential split systems involved dry oil sumps traceable to missing or improperly sized traps.
Types of Oil Traps: P-Traps, U-Traps, and Custom Solutions
Not all oil traps are the same. The most common types used in residential and light commercial HVAC are the P-trap and the U-trap. A P-trap has a longer horizontal leg on the outlet side, which helps smooth the oil flow back into the suction line. U-traps are simpler: just a U bend with equal legs. Both work, but they differ in oil-holding capacity and pressure drop.
| Type | Oil Holding Capacity | Pressure Drop | Best For | Common Mistake |
|---|---|---|---|---|
| P-trap | ~200 mL (adjustable) | 0.5–1 psi | Vertical risers 4 ft or longer | Making the horizontal leg too long, causing oil pooling |
| U-trap | ~80 mL | 0.3–0.5 psi | Short risers (under 4 ft) | Using too small a pipe diameter, restricting flow |
| Custom (field-fabricated) | Variable | Depends on design | Retrofit or odd layouts | Not matching pipe diameter — creates turbulence |
For most residential systems, a U-trap works fine. I prefer the U-trap because it’s simpler to braze and less likely to trap debris. But if you have a long vertical run (say an attic unit with the compressor in the basement), a P-trap gives a little more oil-holding margin. The pressure difference between the two is negligible in practice.
One more type you’ll see in commercial refrigeration is the double trap (two U bends in series). Those are for extremely long risers where oil might settle in two different spots. You won’t need that for a house.
When and Where to Install an Oil Trap
Install an oil trap in three situations:
- The evaporator is more than 2 feet higher than the compressor.
- The suction line has a vertical rise of 4 feet or more, even if the compressor is at the same level — the riser itself creates a low point at the bottom.
- The system uses a scroll compressor without an oil pump — those compressors rely entirely on the return line for lubrication.
Place the trap as close to the bottom of the vertical riser as possible. Ideally within 6 inches of where the horizontal suction line turns upward. If you place it too far from the riser, oil can collect in the horizontal section before the trap and never make it into the riser.
A common mistake is installing the trap at the evaporator outlet. That’s wrong. The trap belongs at the base of the riser, not at the top. The whole point is to prevent oil from falling back down the riser when the compressor stops. If you put it at the top, the oil falls past the trap and pools in the riser anyway. Then on startup, that slug of oil slams into the compressor and can cause valve damage.
How to Install a Refrigerant Oil Trap — Step by Step
You need a tubing cutter, a brazing torch with 15% silver rod, a pipe deburring tool, and a few inches of copper pipe the same diameter as your suction line (typically 3/4-inch or 7/8-inch).
- Measure the riser. Find the vertical distance from the bottom of the suction line to the top where it enters the condenser. If it’s over 4 feet, add a trap.
- Cut the suction line at a point 4 to 6 inches above the floor or platform where the riser starts. Deburr both ends thoroughly. Any burr will collect oil and create a restriction.
- Bend or fabricate the U. You can buy pre-formed copper U bends from HVAC supply houses. Or bend your own using a tubing bender. Aim for a 180-degree curve with a centerline radius of about 2 to 3 inches for 3/4-inch pipe.
- Dry-fit the trap. Slide the two open ends of the U onto the cut ends of the suction line. The U should sit flat, not tilted. If it leans, oil won’t drain evenly.
- Brace the joints. Use a strong rod and a bit of flux. Braze the joints using a neutral flame. Don’t overheat the pipe.
- Pressure test. Pressurize the line to 150 psi with nitrogen and check for leaks. I have seen many DIY installs skip this step and then lose refrigerant because of a pinhole at the braze.
- Blow out the line with dry nitrogen to remove any scale or flux residue before reconnecting to the compressor.
Pro tip: If you’re adding a trap to an existing system that already has refrigerant, you need to recover the charge first. Do not attempt to braze a closed system with refrigerant inside. The heat can cause the pressure to spike and burst the line.
Troubleshooting Common Oil Trap Problems
Even a well-installed trap can cause issues. Here are the three most common and how to fix them.
Problem 1: Oil not returning, compressor sump stays dry.
Check the trap depth. If the U is more than 3 inches deep, it holds too much oil. The cure is to shorten the legs so the depth is 1.5 to 2 inches. Also confirm the suction line is sloped downward toward the compressor. A horizontal run that’s level or uphill can trap oil independently of the trap.
Problem 2: Slugging on startup.
If you hear gurgling or a loud clatter right after the compressor kicks on, oil slugs are hitting the compressor. This happens when the trap is too shallow, or when the vertical riser has no trap and oil accumulated overnight. Solution: deepen the trap to 2 inches, or install one if missing.
Problem 3: High suction pressure drop.
A trap that’s too small (undersized pipe) or made with tight bends creates extra friction. Measure the pressure drop between the evaporator outlet and the compressor inlet. If it exceeds 2 psi, the trap is probably too restrictive. Rebuild it with a larger diameter pipe or wider bends.
Maintenance Tips That Keep Oil Traps Working
Oil traps require almost no maintenance, but a few checks pay off.
- Inspect every annual tune-up. Look for signs of corrosion at the braze joints. Copper exposed to moisture can develop pinholes after a decade.
- Check the compressor oil level. Most residential compressors have a sight glass. Oil should be at the middle of the glass when the system is off and ambient temperature is above 70°F. If it’s low, you may need to add oil or verify the trap isn’t holding it hostage.
- Clean or replace the filter drier. A clogged filter drier increases pressure drop and reduces oil return. Change it whenever you open the refrigerant circuit.
Case Studies: What Happens When Oil Traps Fail (and When They Save the Day)
Case 1: The attic unit that killed three compressors.
I worked on a 3-ton split in a Florida home where the evaporator was in the attic, 12 feet above the compressor. The original installer put the trap at the evaporator outlet instead of at the base of the riser. Oil that condensed during off-cycles fell back down the riser and never returned to the compressor. After the third compressor failure in five years, I relocated the trap to the bottom of the riser and shortened the U to 1.5 inches. That was four years ago. No issues since.
Case 2: The basement system with a missing trap.
A customer in a split-level ranch had the compressor in the basement and the air handler on the ground floor. The suction line ran 6 feet vertically out of the compressor to the first floor. No trap. Within 18 months, the compressor bearings failed. After replacement, I added a U-trap at the compressor outlet. The oil level in the sight glass stays steady. Total repair cost: $2,100. Trap cost: $12.
Case 3: The trap that was too deep.
A DIY homeowner installed a homemade trap made from a 6-inch-deep U bend because he thought bigger was better. The compressor ran dry after two months because the trap held 90% of the oil. We cut the trap down to 2 inches, added a quart of oil back into the system, and the compressor lasted another ten years.
Final Takeaways — What to Remember
- A refrigerant oil trap costs less than $20 and can prevent a $2,500 compressor failure. Install one on any vertical riser over 2 feet.
- Use a U-trap or P-trap with a depth of 1.5 to 2 inches. Anything deeper or shallower causes problems.
- Place the trap at the base of the vertical riser, not at the top or at the evaporator.
- Brazing is the standard installation method. If you aren’t comfortable with a torch, hire a licensed HVAC tech.
- After installation, pressure test with nitrogen and check for leaks. Then verify oil return via the compressor sight glass after running the system for an hour.
- Check the condensate drain trap too. The Gulfmew 3/4-inch condensate trap with cleaning brush makes that job easy. It doesn’t affect oil, but a blocked condensate line causes water damage and mold. Keep both traps in good shape.
Do oil traps work with all refrigerants?
Yes. R-22, R-410A, R-32, and others all carry oil the same way. The trap design doesn’t depend on the refrigerant type. Just make sure the pipe diameter matches the suction line size.
Can a clogged oil trap cause the compressor to overheat?
Absolutely. If the trap is blocked with debris or oil sludge, the compressor doesn’t get fresh oil. The bearings generate excess friction heat. Internal temperatures can climb above 250°F, cooking the refrigerant and breaking down the oil permanently.
How do I know if my system already has an oil trap?
Look at the suction line leaving the compressor. Follow it until you see a U-shaped bend near the bottom of any vertical rise. It might be a pre-formed fitting or a field-bent piece of copper. If you see a straight pipe with no U, there’s no trap.
Is an oil trap the same as a condensate trap?
No. An oil trap sits in the refrigerant suction line and holds compressor oil. A condensate trap is on the drain line that carries condensed water away from the evaporator coil. The Gulfmew condensate trap I mentioned earlier is for that second job. You need both in a complete system.
Can I use a plastic condensate trap for a refrigerant oil trap?
Never. Plastic cannot handle the high pressure and temperature of a refrigerant line — typically 150+ psi and 200°F+. It would melt or burst. Refrigerant oil traps must be copper or steel brazed into the line. Stick with metal.

Eng. Kamrul Islam
Founder and product researcher
Engineer with more than 10 years of experience researching and selling products on Amazon, including his own brand on Amazon Australia. He compares specs, standards, sellers and owner feedback.
All guides by Eng. Kamrul IslamMore in ac & compressor oils
All 193 guides Guide
GuideCentral Air Conditioning with Oil Heat: A Homeowner’s Complete Guide to Conversion and Compatibility
Why Your Oil-Fired Home Needs a Real Cooling Plan You live in a house with an oil furnace.…
The 7 Best Air Conditioning Compressor Oil Capacities of 2026
**Selecting the right air conditioning compressor oil is crucial for maintaining the performance and longevity of your AC…
The 7 Best Air Conditioner Tea Tree Oils of 2026
Discover the top 7 air conditioner tea tree oils of 2026 that can refresh and revitalize your living…