 Eng. Kamrul Islam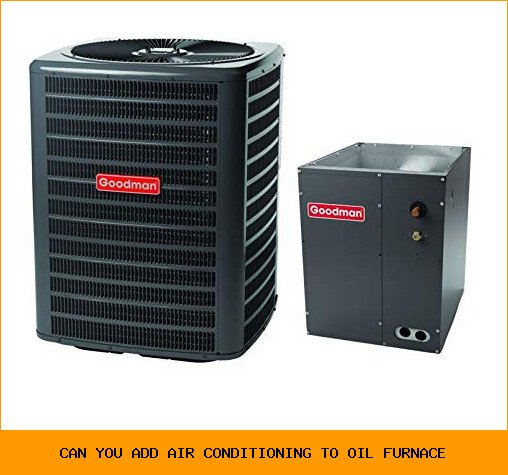
In this guide
- Goodman 2 TON 13.4 SEER2 R-32 AC Only System…
- Can You Add AC to an Oil Furnace?…
- Types of Air Conditioning Systems for Oil…
- Assessing Your Home’s Ductwork and…
- Installation Process: What to Expect
- Costs and Budgeting for Your AC Addition
- Maintenance Tips for Your New AC System
- Common Challenges and Solutions
- Energy Efficiency and Environmental…
- Selecting the Right HVAC Contractor
- Frequently Asked Questions
- Final Things to Know Before You Buy
You’re sitting in your living room on a July afternoon. The oil furnace in the basement kept you warm all winter, and now you’re sweating through a third heat wave. You wonder: can you add air conditioning to that oil furnace without tearing everything out? The short answer is yes—most homes with an oil-fired forced-air furnace can accept a central air conditioner with reasonable effort. But the full answer involves ductwork condition, furnace blower capacity, refrigerant type, and a few code requirements you should know about before you call a contractor.
This article walks you through everything a typical homeowner needs to understand: which AC systems work with an oil furnace, how to check if your existing ductwork and blower are up to the job, what the installation process looks like, what it costs, and how to pick a contractor who won’t cut corners. By the end, you’ll know whether adding AC makes sense for your house—and what steps to take next.

Goodman
Goodman 2 TON 13.4 SEER2 R-32 AC Only System with Vertical coil (GLXS3BN2410 condenser and CAPTA2422A3 coil)
Home Comfort Solution: Elevate your living with Goodman's standout HVAC products. Merge the efficiency of the Goodman 2 Ton 13.4 SEER2 AC ONLY GLXS3BN2410 and the Goodman Vertical coil CAPTA2422A3. This duo forms the basis of a system, promising efficient cooling, consistent heating, and precision in temperature control, all crafted to deliver sustained performance over years. Note that you will need a furnace or blower to make this a complete system.
Buy on AmazonOne popular option for pairing with an oil furnace is a split-system central air conditioner like the Goodman 2 TON 13.4 SEER2 R-32 AC Only System with Vertical Coil (model GLXS3BN2410 and CAPTA2422A3). This setup provides a condenser unit and an evaporator coil designed to sit on top of your existing furnace. It’s a complete cooling solution that requires a furnace or blower to move air—which your oil furnace already provides. The system uses R-32 refrigerant, which is more efficient and has lower global warming potential than older refrigerants. You’ll need a compatible thermostat and a professional to install it, but it’s a straightforward upgrade for many homes.
Can You Add AC to an Oil Furnace? Understanding Compatibility
Most oil furnaces in the U.S. are forced-air systems. That means they push heated air through ducts using a blower fan. Adding air conditioning to that same ductwork and blower is mechanically simple: you place an evaporator coil in the supply air stream (usually on top of or downstream of the furnace), run refrigerant lines to an outdoor condenser, and wire a thermostat that controls both heating and cooling.
Three compatibility checks matter most:
- Blower motor capacity. Your furnace’s blower must move enough air volume (measured in CFM) for cooling. Many oil furnace blowers are sized only for heating, which requires less airflow than air conditioning. A typical 2.5-ton AC needs about 1000 CFM. If your blower can’t deliver that, you may need a motor upgrade or a new furnace.
- Coil plenum space. The evaporator coil needs a metal box (plenum) above the furnace that’s tall enough to fit the coil without airflow restrictions. Some older furnaces have short plenums that need modification.
- Refrigerant and electrical. Older oil furnaces don’t have a built-in refrigerant handling system—that’s normal. But you’ll need a dedicated 240V circuit run to the outdoor condenser location and clearance for refrigerant lines. If your electrical panel is full, budget for a subpanel.
In nearly every case, a competent HVAC contractor can work around these limitations. The furnace itself does not need to be replaced unless it’s nearing end of life (15–20 years old) or has a weak heat exchanger.
Types of Air Conditioning Systems for Oil Furnaces
You have three main paths when adding cooling to a home with an oil furnace. Each has its own pros and trade-offs.
Central AC
This is what most people imagine: a split-system with an outdoor condenser and an indoor evaporator coil installed on the furnace. It uses your existing ductwork. Central AC is the most efficient option for whole-home cooling if your ducts are in good shape. Installation cost for a 2–3 ton system runs $4,000 to $8,000 depending on labor and local rates. The Goodman 2 Ton 13.4 SEER2 system mentioned earlier is a solid mid-efficiency choice that won’t waste money on electricity you don’t need. One thing to note: SEER2 is the new rating standard that accounts for real-world static pressure, so a 13.4 SEER2 unit roughly equals a 14 SEER unit under the old scale.
Ductless Mini-Splits
If your home has no ductwork or the ducts are too small or leaky, a ductless mini-split is your best bet. A single outdoor unit can serve one to four indoor air handlers mounted on walls or ceilings. These systems don’t touch your oil furnace at all—they’re completely independent. That means you keep the furnace for heating and use the mini-split only for cooling (or reverse-cycle heat if you choose a heat pump model). Cost per zone runs $3,000 to $5,000 installed. Great for room additions, finished basements, or homes where ductwork is impractical.
Heat Pumps
A heat pump is an air conditioner that can run in reverse to provide heat. You can install a heat pump as the cooling system and keep your oil furnace for backup heat on the coldest days—this is called a dual-fuel setup. It’s a smart move if your oil prices are high, because the heat pump handles milder weather (down to about 25-30°F) more efficiently than burning oil. When it gets really cold, the furnace kicks in. The upfront cost is higher than a straight AC (add $1,500-$3,000 for a heat pump vs. AC of the same size), but you’ll save on oil over the long run.
Here’s a quick comparison to help you decide:
| System Type | Uses Existing Ducts? | Typical Cost (Installed) | Best For |
|---|---|---|---|
| Central AC | Yes | $4,000 – $8,000 | Homes with adequate ductwork; lowest operating cost per cooled square foot |
| Ductless Mini-Split | No | $3,000 – $6,000 per zone | Homes without ducts, room additions, uneven cooling needs |
| Heat Pump (dual-fuel) | Yes (or ductless) | $5,500 – $11,000 | Homes wanting to cut oil use; moderate climates with cold snaps |
Assessing Your Home’s Ductwork and Furnace
Before you buy any equipment, you need to know what you’re working with. Start with the ductwork. Leaky ducts waste 20–30% of cooling energy. If your ducts are old, uninsulated, or visibly damaged, fix or seal them before adding AC. A duct blaster test by an HVAC contractor costs $200–$400 and tells you exactly where leaks are.
Next, measure your furnace blower’s CFM output. Most oil furnace blowers are belt-driven and can be adjusted by changing pulley size or motor speed tap. A contractor can measure static pressure and airflow with an anemometer. If your blower moves less than 350 CFM per ton of cooling needed, you have two options: install a higher-speed motor (typically $300–$600 parts and labor) or size the AC system smaller to match the airflow.
Don’t forget the evaporator coil location. The coil must sit in the supply plenum, which is the metal duct directly above the furnace. If your plenum is less than 12 inches tall, the coil might not fit without cutting and extending it. That’s an extra $200–$500 in sheet metal work.
Installation Process: What to Expect
A professional installation typically takes one to two days. Here’s what happens.
Pre-Installation Considerations
The contractor will perform a Manual J load calculation to determine the correct size AC for your home. Oversizing is a common mistake—it causes short cycling, poor humidity removal, and higher bills. A 2-ton unit (like the Goodman system) is right for a 1,200–1,700 square foot home with average insulation. Your contractor should also check local building codes: some municipalities require a permit for adding AC, especially when running new electrical circuits or altering ducts.
You’ll need a location for the outdoor condenser. It needs at least 12 inches of clearance on each side for airflow, and it should sit on a concrete pad or a plastic base. Avoid placing it near bedrooms where compressor noise (about 70 dB) might be annoying.
Step-by-Step Installation Guide
- Shut down power to the furnace and the main electrical panel at the condenser location.
- Mount the outdoor condenser on a level pad, install vibration isolators, and connect it to the house with refrigerant lines (typically 3/8-inch liquid line and 3/4-inch suction line).
- Install the evaporator coil in the furnace plenum. This involves cutting the plenum, sliding in the coil, and sealing it. The Goodman vertical coil CAPTA2422A3 is designed for easy placement on top of most furnaces.
- Run control wiring from the thermostat to both the furnace and the condenser. If you’re adding a new thermostat, make sure it supports both heating (oil) and cooling—most modern digital thermostats do.
- Pull a vacuum on the refrigerant lines to remove moisture and air. Then open the condenser’s service valves to release R-32 refrigerant. The system is pre-charged for 15 feet of line set—if your run is longer, you’ll need additional refrigerant.
- Test the system: turn on cooling, check supply air temperature (should be 14–20°F cooler than return air), verify proper superheat and subcooling, and listen for any unusual noises.
That’s the simple version. In reality, expect surprises—rusted bolts, old wiring that’s undersized, or a furnace that doesn’t play nice with the new thermostat. A good contractor handles these without upselling.
Costs and Budgeting for Your AC Addition
Total installed cost for adding central AC to an oil furnace usually lands between $4,000 and $9,000. Break it down:
- Equipment (condenser + coil): $1,200–$2,500 (the Goodman 2-ton system is on the lower end of that range)
- Labor: $1,500–$3,500
- Ductwork modifications: $0–$1,000 (if plenum extension or sealing is needed)
- Electrical work (new 240V circuit, disconnects): $400–$800
- Permits and inspection: $100–$300
You might qualify for rebates from your local utility or state energy office for installing a high-efficiency system. The Goodman 13.4 SEER2 unit qualifies in many programs—check the DSIRE database for your area. Expect a rebate of $100–$500, which helps offset the cost.
Financing is common. Many HVAC contractors offer 12- to 60-month plans through third-party lenders. Unless you’re getting 0% interest, pay cash if you can—interest rates on HVAC loans often run 9–18%.
Maintenance Tips for Your New AC System
Your oil furnace still needs annual burner service (soot cleaning, nozzle replacement, etc.). The AC part needs separate care. Here’s what to do:
- Change the furnace filter every 1–3 months during cooling season. A dirty filter in an oil furnace system causes higher static pressure and can freeze the evaporator coil.
- Clean the outdoor condenser coils every spring. Spray them with a garden hose from the inside out. Don’t use a pressure washer—you’ll bend the fins.
- Check the condensate drain line. AC produces a lot of water, and a clogged drain can cause water damage or shut down the system. Pour a cup of vinegar down the drain line every two months.
- Schedule a professional tune-up every two years for the AC side. They’ll check refrigerant charge, electrical connections, and airflow.
Common Challenges and Solutions
You’ll hit at least one of these after an AC addition to an oil furnace:
- Insufficient airflow. The AC works but doesn’t cool well. Fix: have a technician measure static pressure. They may need to increase blower speed, add a return duct, or install a higher static-rated coil.
- Furnace short-cycles on heating after AC install. Sometimes the addition of a coil changes airflow enough that the furnace’s high-limit switch trips. Fix: adjust fan speed or recalibrate the limit switch.
- Thermostat doesn’t turn on cooling. Common when the old furnace uses only two wires. You need a three- or four-wire thermostat cable to send the cooling signal. An installer can run new wire or use a wireless adapter.
- Outdoor unit runs but no cool air indoors. Likely a refrigerant leak or a stuck expansion valve. Have a pro check pressures—do not try to add refrigerant yourself without a license (R-32 requires EPA certification).
Energy Efficiency and Environmental Considerations
Adding AC doesn’t have to kill your electric bill. A properly sized 13.4 SEER2 unit in a 1,500-square-foot home will cost about $300–$500 per cooling season (assuming $0.12/kWh). That’s less than running a few window units all summer. If you opt for a higher SEER2 system (16+), you’ll save another 15–25% in electricity, but upfront cost jumps by $1,000–$2,000.
The R-32 refrigerant in the Goodman system is a big deal environmentally. It has a global warming potential (GWP) of 675, compared to R-410A’s 2,088. That’s a 68% reduction. Some states (California, Washington) are phasing down R-410A, so buying an R-32 system now future-proofs your home. Just be aware that R-32 is mildly flammable (A2L classification). Installers must follow specific handling rules, including using a leak detection system when the indoor coil is near a furnace. Your contractor should know these codes—if they don’t, find a different one.
Selecting the Right HVAC Contractor
This might be the most important decision you make. A bad install can turn a good AC into a money pit. Look for:
- NATE certification (North American Technician Excellence) for the lead installer.
- At least three references from recent AC-on-oil-furnace jobs. Call them and ask about the workmanship, timing, and whether they had callbacks.
- A written Manual J load calculation as part of the quote. If they skip this, they’re guessing the size.
- Insurance (liability and worker’s comp). Verify they’re current and ask for a certificate.
- Local knowledge. A contractor familiar with your town’s permit process and building codes saves headaches.
Get three quotes. Don’t automatically take the cheapest one—a low bid often means undersized equipment, reused old linesets, or no permit. A mid-range bid with detailed scope is usually your best bet.
Frequently Asked Questions
Will adding AC to my oil furnace reduce its efficiency for heating?
No. The evaporator coil sits in the airstream but doesn’t affect the furnace’s combustion or heat transfer. You might see a tiny increase in static pressure (which slightly raises blower power), but it’s negligible—less than 1% of heating efficiency.
Do I need to replace my oil furnace to add central AC?
Not if your furnace is in good condition and has a blower that can handle the required airflow. If the furnace is more than 20 years old, has a cracked heat exchanger, or uses a belt-driven blower that can’t be upgraded, replacement is smarter. Otherwise, keep it and add the coil.
Can I install the AC myself to save money?
Legally, no—handling R-32 refrigerant requires an EPA Section 608 certification. Even if you’re handy, evacuating the lines and charging the system correctly takes specialized tools (vacuum pump, manifold gauges, leak detector). Mistakes cause expensive compressor failures. Hire a pro.
How do I know if my ductwork is big enough for AC?
A contractor will measure static pressure and compare it to the equipment’s design specs. A rough rule: supply ducts should be at least 8 inches in diameter for every ton of cooling. If your trunk duct is smaller than 16 inches for a 2-ton system, you’ll likely need modifications.
What’s the difference between a vertical coil and a cased coil?
Vertical coils (like the Goodman CAPTA2422A3) sit upright in the plenum above the furnace. Cased coils are housed in a sheet-metal box that attaches to the furnace. Both work the same way. Vertical coils are generally easier to fit into tight plenums because they’re narrower.
Final Things to Know Before You Buy
- Adding central AC to an oil furnace is almost always possible—just verify blower capacity and duct condition first.
- Central AC is the most cost-effective option if your ductwork is adequate; ductless mini-splits are better for homes without ducts.
- Budget $4,000–$9,000 total installed. Equipment costs fall in the $1,200–$2,500 range; labor is the bigger variable.
- A Manual J load calculation is non-negotiable. Don’t let a contractor size by rule of thumb.
- R-32 refrigerant saves energy and reduces environmental impact—but requires a certified installer who follows leak-detection rules.
- Check for local rebates before buying; they can knock $100–$500 off the project.
- Hire a NATE-certified contractor with specific experience in oil-to-AC conversions. Your comfort depends on it.

Eng. Kamrul Islam
Founder and product researcher
Engineer with more than 10 years of experience researching and selling products on Amazon, including his own brand on Amazon Australia. He compares specs, standards, sellers and owner feedback.
All guides by Eng. Kamrul IslamMore in ac & compressor oils
All 193 guidesThe 7 Best Air Con Pump Oils of 2026
**Choosing the right air con pump oil is crucial for maintaining the efficiency and longevity of your air…
What Is The $5000 Rule For Hvac?
When it comes to maintaining your HVAC system, understanding the various rules and guidelines can significantly impact its…
How Often Air Conditioner Recharge
Air conditioners are essential appliances that provide comfort during hot seasons, but maintaining their performance requires understanding several…