 Eng. Kamrul Islam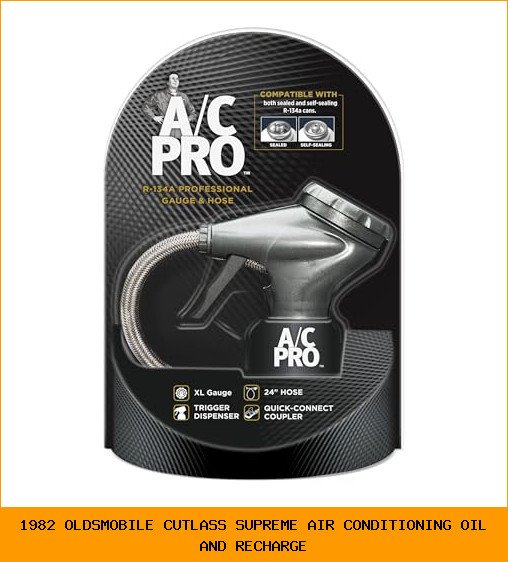
In this guide
You crank the blower on your 1982 Cutlass Supreme. Hot air hits you in the face. The compressor clutch clicks on, off, on again, but nothing cool happens. If you’ve owned this car long, you know the feeling. The factory R-12 system is probably low on refrigerant, or the oil dried up years ago. Recharging it yourself isn’t rocket science, but one wrong move can cost you a compressor.
This article walks you through the entire process: what oil to use, how to retrofit from R-12 to R-134a if needed, and the exact steps to recharge without blowing a seal or freezing the evaporator. You’ll know the tools you need, the pressures to shoot for, and the three mistakes that kill an old Cutlass AC system. No fluff, just what works.
After you read this, you’ll be able to pull a vacuum, add the correct amount of PAG or ester oil, and charge the system so it blows cold all summer. You’ll also know when to walk away and call a shop.
To get the job done right, you need a reliable gauge set that lets you see both low and high side pressures. The InterDynamics Car Air Conditioner Gauge and Hose (A/C Pro) is a solid choice for a DIY recharge. Its 24-inch hose reaches the awkward low-side port on these old GM compressors, and the push-on quick-connect coupler saves you from wrestling with threads. The trigger dispenser lets you add refrigerant a little at a time, which is exactly what you want when you’re shooting for a specific pressure window. Check the current price on Amazon — it’s cheaper than buying a full manifold gauge set and works for R-134a retrofits.
Understanding Your 1982 Cutlass Supreme AC System
The factory system came with R-12 refrigerant and mineral oil. R-12 is a chlorofluorocarbon (CFC) that’s been banned from production since 1994. You cannot buy it over the counter without an EPA certification. Most Cutlass owners convert to R-134a, which uses a different type of oil: PAG (polyalkylene glycol) or ester oil. Ester oil is the safer choice because it mixes with leftover mineral oil. PAG does not — it’ll separate and wreck your compressor.
The compressor on most 1982 Cutlass Supremes is the GM A6 or a later R4 model. The A6 is a big six-cylinder piston compressor. It holds about 8 ounces of oil. The R4 holds around 6 ounces. The condenser is a small tube-and-fin unit up front. The orifice tube sits in the liquid line near the condenser outlet. This system has no accumulator; it uses a receiver-drier. If you’ve never opened it, the desiccant bag inside that drier is probably saturated. Replace the receiver-drier when you convert refrigerants. Period.
Oil quantity matters more than you think. Too little oil starves the compressor, causing a seized bearing. Too much oil blows out the reed valves and coats the condenser, reducing heat transfer. The spec is usually 8 oz for an A6, but you have to account for oil lost when you recover the old stuff and replace components. I’ll walk you through the math in the next section.
Preparing for a Retrofit or Recharge
Before you touch a can of refrigerant, confirm what you’re working with. Is the system empty, or does it still hold pressure? If it still has R-12, you need to recover it legally. You can’t vent it to atmosphere. A shop will recover it for maybe $40–60. Or you can buy a recovery machine, but that’s not practical for one car. Best bet: take it to a shop for recovery, then bring it home for the recharge.
Once the system is empty, replace these parts: the receiver-drier, the orifice tube, and all O-rings that you disturb. O-rings come in different materials — use HNBR (green or blue) for R-134a, not the old black rubber Buna-N that swells with ester oil. A basic O-ring kit for GM cars costs under $15. The receiver-drier runs about $25–40. The orifice tube is a few bucks. Total parts under $70, and it eliminates 90% of future leaks.
Flush the system if you see black sludge inside the compressor outlet or the condenser. That sludge indicates a compressor failure. Flushing alone won’t fix it — you need a new compressor. If the oil looks clean (light amber or clear), skip the flush. Just blow out the lines with compressed air.
Step-by-Step: Adding Oil and Recharging with R-134a
Here’s the sequence. Follow it exactly. Skipping steps leads to a dead system.
- Vacuum the system for at least 30 minutes. Hook up your vacuum pump to the low-side port. Pull it down to 500 microns or lower. A cheap gauge won’t show microns, so run the pump for 45 minutes minimum. This boils out moisture. If the vacuum doesn’t hold after you close the pump valve, you have a leak. Fix it.
- Add the correct oil. For an R-134a conversion using ester oil, add 7 oz for an A6 compressor or 5 oz for an R4. Pour it into the compressor suction port while slowly rotating the clutch by hand. This coats the internals before startup. Close the port.
- Charge with R-134a liquid into the high side (compressor off). With the engine off, connect your refrigerant can upside down (liquid charge) to the high-side port. Open the valve slowly. This pushes liquid into the condenser and receiver-drier. Do not run the compressor yet. Add about half the total charge — roughly 24 ounces for an A6 system.
- Switch to low-side vapor charge. Close the high-side valve. Start the engine, set AC to max cool, blower on high. Open the low-side valve and add R-134a as a vapor (can upright). Watch the low-side pressure. Target low side: 25–35 psi on a 75–85°F day. High side: 175–225 psi. Adjust charge slowly.
- Check vent temperature. Stick a thermometer in the center vent. You want 38–50°F. If it’s above 55°F, you’re undercharged or the orifice tube is clogged. If it freezes and cycles off, you’re overcharged.
If you’re using the InterDynamics A/C Pro gauge, the trigger dispenser makes step 4 easy. Squeeze for a burst, wait 10 seconds, check pressure, repeat. The large gauge is readable from inside the car while you watch the vent temp.
Common Mistakes and How to Avoid Them
I’ve seen three errors destroy more Cutlass AC systems than anything else. Here they are, plain.
Mistake 1: Over-oiling. Guys dump an entire 8-ounce bottle into a system that only needs 5. Result: the compressor hydraulic locks, blows the front seal, and you get a puddle of oil under the car. Measure with a graduated cylinder. Don’t eyeball it.
Mistake 2: Charging liquid into the low side with the engine running. This slugs the compressor with liquid refrigerant. It sounds like a hammer hitting the valve plate. Within seconds you’ll have a dead compressor. Always charge liquid into the high side with the engine off, or vapor into the low side with the engine running.
Mistake 3: Not replacing the receiver-drier. The old drier is full of moisture. When you add fresh refrigerant, that moisture freezes at the orifice tube, blocking flow. The system works for five minutes then stops. Replace it every time you open the system.
One more: using PAG oil instead of ester oil when converting from R-12. PAG doesn’t mix with mineral oil. If you don’t flush out 100% of the mineral oil, the PAG separates and creates an oily sludge that clogs the orifice tube. Use ester oil. It’s compatible with both R-12 mineral oil and R-134a.
Quick Reference: Oil and Charge Quantities
| Component / Condition | Oil Type | Oil Amount | R-134a Charge (approx.) |
|---|---|---|---|
| Factory R-12 system (A6 compressor) | Mineral oil | 8 oz | 2.5 lb R-12 (not available retail) |
| Convert to R-134a (A6 compressor, flushed) | Ester oil | 7 oz | 32–36 oz R-134a |
| Convert to R-134a (R4 compressor, flushed) | Ester oil | 5 oz | 24–28 oz R-134a |
| Convert without flushing (residual mineral oil) | Ester oil | Add 2–3 oz, skip flush | Same as above |
| New compressor, system clean | Ester oil for R-134a | Per compressor spec (check label) | Same as above |
Charges are approximate. Actual values depend on ambient temperature, system condition, and orifice tube size. Start with the lower end and add refrigerant until the vent temp drops below 50°F.
Five Real Questions People Ask About the 1982 Cutlass Supreme AC
Can I still buy R-12 for my 1982 Cutlass?
Technically yes, but only with an EPA Section 608 certification. Small cans of R-12 are still sold online by private sellers, but they’re expensive — $40–60 per 12-ounce can. You’d need four or five cans. Also, the oil in the system is probably degraded. R-12 itself doesn’t go bad, but mineral oil absorbs moisture after decades. You’re better off converting to R-134a. It’s cheaper, easier to find, and you can do it yourself without a license.
What oil should I use for a retrofit: PAG or ester?
Ester oil. Hands down. PAG oil is specified for factory R-134a systems that were designed for it. In a conversion where residual mineral oil remains, PAG separates and causes problems. Ester oil is compatible with both mineral oil and R-134a. It also has better lubricity for older compressor seals. One brand I’ve used successfully is Four Seasons 28638 — it’s cheap and reliable. Just don’t mix it with PAG.
How do I know if my compressor is bad before I recharge?
Spin the clutch by hand. It should turn smoothly without grinding. Check for play in the shaft — more than 1/16 inch means the bearing is shot. Listen for the clutch engaging: with the engine running and AC on, the clutch should click in firmly. If it rattles or fails to engage, the gap between clutch and pulley might be off, or the coil is dead. Also check the compressor oil: remove the inspection plug and dip a clean wire inside. If the oil looks like chocolate milk or smells burnt, the compressor is done.
Why does my Cutlass AC blow cold then warm up after 10 minutes?
Classic symptom of a freezing orifice tube or a low refrigerant charge with a clogged receiver-drier. When moisture freezes at the orifice tube, flow stops, the low side pressure drops, and the vent warms up. Wait 15 minutes, it defrosts, and it cools again briefly. Replace the receiver-drier and orifice tube. Also check the charge — if you’re low, the evaporator runs too cold and ice forms. Add 2–4 ounces and see if the cycle stops.
Can I just top off the R-134a without evacuating the system?
Not if you’re converting from R-12. You can’t mix refrigerants. If the system still has R-12, you must recover it first. If it’s already R-134a and just low, you can top off, but check the oil level. Low refrigerant often means a leak, which also lost oil. Add half an ounce of ester oil for every 12 ounces of refrigerant you add. Use a graduated cylinder. Don’t guess.
What to Do Next: Five Actions for a Cold Cutlass
- Replace the receiver-drier and orifice tube before charging. They’re cheap and prevent most repeat failures.
- Use ester oil for any R-134a conversion. Measure it precisely with a graduated cylinder — no guessing.
- Evacuate the system for at least 45 minutes with a vacuum pump. Moisture is the enemy of old AC systems.
- Charge liquid into the high side with the engine off, then finish with vapor on the low side with the engine running. Never put liquid into the low side.
- Target a low-side pressure of 25–35 psi at 75–85°F ambient. If the vent temperature stays above 55°F, add refrigerant in 2-ounce increments until it drops.
- Check all O-rings at the compressor, condenser, and lines. Use HNBR O-rings for R-134a. A $10 kit saves hours of hunting a leak.
- Buy a good gauge set like the InterDynamics A/C Pro if you don’t own one. The trigger dispenser makes small adjustments easy, and the 24-inch hose reaches the low-side port on these cars without straining the fitting.

Eng. Kamrul Islam
Founder and product researcher
Engineer with more than 10 years of experience researching and selling products on Amazon, including his own brand on Amazon Australia. He compares specs, standards, sellers and owner feedback.
All guides by Eng. Kamrul IslamMore in motor & engine oils
All 185 guidesWhy Engine Oil Pressure
Understanding engine oil pressure is critical for maintaining your vehicle’s health and performance. Engine oil plays a vital…
When Engine Oil Smells Like Gas
When engine oil smells like gas, it can be a troubling sign for vehicle owners. This unusual odor…
Which Motor Oil Is High In Zinc
When it comes to maintaining your vehicle’s engine, selecting the right motor oil is crucial for optimal performance…